Havoc
Written by Pepper
Last updated on 2008-01-07
Plans for version 1.0 "Havoc"
Disclaimer
If used correctly, no-one will get hurt, but if this WBL gets into the wrong hands, someone could get injured. Putting in something like a rock or stick makes this a weapon, so don't do it. A water balloon shot out of this gun gets going faster than 90 fps/60 mph, so be careful. If some one gets hurt using theses plans, I am in no way responsible. By reading this, you are agreeing to only blame yourself if you, someone else, or someone's property gets hurt from your actions.
Tools needed
- a drill
- many drill bits
- a mider or hack saw with a fine toothed blade
- some sort of knife for minor carving (x-sacto knife preferred)
- sanding paper (grit size doesn't matter)
- a monkey wrench
- a clamp to clamp pieces together
- a bike pump. The bigger the better, because then you can pump the gun up quicker.
- A disposable buffer. I use an empty shopping bag. The buffer eases the balloon out the barrel. Without a buffer the balloon will most likely pop. Things needed for building
- 1 10' foot section of 2" schedule 40 PVC pipe. This pipe needs to be pressure rated. Don't use ABS pipe! It's not pressure rated, so it will explode when you pump it up.
- 1 2' section of 1" schedule 40 PVC pipe
- 1 2" schedule 40 PVC coupling
- 2 1" schedule 40 PVC elbows
- 1 2" schedule 40 PVC end cap
- A way to convert the PVC pipe from 2" down to 1". You might be able to find a 2"x1" adapter, but I couldn't. I used a 2"x1 ½" adapter with a 1½"x1" adapter. You'll have to use your brains on this one. You'll need two of these because you will have to convert the pipe from 2" to 1" two times.
- 1 1" ball valve. You should try to find one that can open and close quickly, because the quicker you open it, the farther the balloon will go.
- 1 can of PVC primer (usually comes in purple. Weird)
- 1 can of PVC cement ( make sure it says it can withstand pressure)
- 1 ½" Schrader valve (commonly called a tire valve) one can be bought at http://www.spudtech.com/detail.asp?id=44 if you can't find one anywhere else.
- 1 pressure gauge. If you cant find one anywhere you can buy one at http://www.spudtech.com/detail.asp?id=46
- One roll of Teflon tape.
Construction
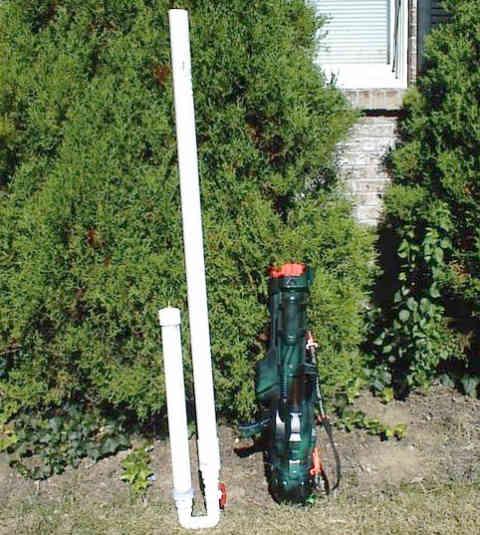
This launcher is put into 2 parts. They are the Barrel section, and the pressure chamber section. You can always look at the picture I have provided if you are uncertain about how the gun is supposed to look.
Many pieces have to be glued together. To glue correctly first coat the pieces that will be connected with PVC primer. Then wait for them to dry. Next you coat the pieces to be connected with PVC cement and quickly push them together. You don't have to be lightning quick, but try to do it quickly. Then clamp them together and let them bond for about an hour. When drilling, brace the piece by either sticking the piece in a vice, or hold it tightly. Apply pressure gradually. The drill bits will try to stick and spin the PVC, but restrain the piece. Try to make all drillings go in straight.
Barrel construction
- Cut 1 section of 2" PVC pipe that's 30 inches. This will be the barrel.
- Slightly carve the inner side of the barrel that will be the breech end. This will make the balloon slide in more easily.
- Cut 1 section of 2" PVC pipe that's 2" long.
- Take your 2" section of pipe from step 3 and glue it to one side of a 2" PVC coupling. Clamp for about an hour.
- Take your coupling from step 4 and slightly carve the inside of the coupling so when you stick the barrel down it, you can pull it out without much trouble. This is how the breech loading system works.
- Glue together one 2"x1" adapter. Clamp for about an hour.
- Glue the adapter from step 6 to the 2" section of pipe from the coupling in step 4. Clamp for about an hour.
- Cut two pieces of 1" PVC pipe that are 1 ½" long each.
- Take your 1" ball valve and close it. Now glue both sections of 1" pipe from step 7 to opposite ends of the ball valve. Clamp together for about an hour.
- Take the ball valve assembly and glue it into the coupling-and-adapter assembly from step 7. The ball valve doesn't have a right way, so it doesn't matter which way you install it. Clamp assembly for an hour.
- Cut one piece of 1" PVC pipe that's 2" long. Now get your two 1" PVC elbows and glue them together using the cut section of pipe as the connecter. The empty ends of the elbows should be facing the same direction. This will connect the barrel section and the pressure chamber section together.
- Glue the ball valve-coupling-adapter assembly from step 9 to the elbow section from step 10. Looking at the picture will clarify if you are confused.
Pressure chamber construction
- Cut a section of 2" PVC pipe that is 23" long. This will be your pressure chamber.
- Glue together a 2"x1" adapter. This will be the exactly same adapter as you made in step 6 in "barrel Construction". Now clamp it.
- Take your 23" PC and glue it to the 2" end of the adapter from step 2. Clamp for about an hour.
- Get your 2" end cap. Now drill a hole slightly smaller than the tire valve. The size drill bit I used was 31/64ths of an inch. Now wrap the tire valves threads and screw into the hole. The place where you pump air should be facing out. Tighten with the monkey wrench.
- Get the end cap with tire valve from step 4 and glue it to the open end of the PC-and-adapter assembly from step 3. Clamp.
- Drill a hole in the PC and adapter assembly that is slightly smaller than the pressure gauges threads. Drill the hole where the adapter and PC meet, where it is twice as thick. Also drill the hole where you could see it when holding the gun. Now wrap the pressure gauges threads with Teflon tape, and screw it in the hole.
- Take your 1" PVC pipe and cut a 2" section of it. Now glue the 2" section of pipe to the 1" side of the adapter you made in step 2.
- This is where you connect the barrel section to the PC section. Take the PC-adapter from step 6 and glue the 1" pipe into the open end of the elbow on the barrel section. (Now the gun should look a lot like the picture, except the barrel on the picture is a longer barrel that I no longer use.)
Assembly of the gun
This is pretty easy, all you have to do is stick the carved end of the barrel into the carved coupling. Now stand back and admire your gun. If it doesn't look like the picture, look the instructions over and find the problem. Reading the steps out-loud helps you to understand them.
How to shoot
First wet the barrel with water. This will act as a lubricant. Now take the barrel off and stick a balloon in it. Stick your wadding on the balloon (I use a Wal*Mart bag because it is cheap, convieneint, and they crumple into very small wads). Wadding help protects the balloon from popping. Put the barrel back on. Make sure the ball valve is closed and pump the gun up to the desired pressure (anywhere from 60-90 P.S.I, NEVER pump over 100 P.S.I or else you might have PVC shrapnel shooting towards you). Now aim and flip the ball valve. You should see the balloon sail 100 or more yards out in the sky.