Pepper's homemade
Written by Pepper
Last updated on 2008-03-02
4/05/03 (ClubAquatica forums)
I got all the parts for my homemade water gun today. It cost $62 from the local hardware store. Of course, the main part was the two check valves (one $9.50, other $11.00) and the ball valve ($10). They didn't have 2 3/4" check valves, so I bought a 3/4" one, and a 1" one. This amount does not include the $13 for the glue and primer, my mom bought those. I haven't had the time to make it yet, and I need to make a good, water tight pump. It will use XP tech, with a 3" reservoir, and 2" pressure chambers. I'm going to leave the nozzle 3/4", and if it's not good, I'll opt for a 1/2" or 1/4" nozzle. I'm still debating on whether or not I should make some kind of shell for it...I know I couldn't make a plastic one, so maybe I'll cover it in duct tape.
4/18/03 (ClubAquatica forums)
Currently, I've put together most of the pieces, and I'm waiting for a chance to go to Home Depot to get the last pieces. The P/C's are done, the check valve area is done, and the pump is waiting for a wooden dowel before I can continue on it. The o-ring off of a 110's tank fits perfectly inside the 3/4" pipe, so all I need is a slightly smaller size wooden dowel, and I'll be in business. I've found that my 1000's nozzle case fits snugly inside a 1" pipe, so I might have a way to get a professional nozzle with screens and stuff. I am also going to make different, interchangeable nozzles using multiple 3/4" end caps. I will drill the nozzle size on, and pop it on, and hope it doesn't fly off. I could also use 3/4" plugs, so I wouldn't have to screw them on.
4/28/03 (Super Soaker Central forums)
I went out to the Home Depot and, amazingly, got all the parts I was lacking. Then I proceeded to cut and glue, cut and glue. It took about 4 hours, but when I was done, it was a sight to behold. The overall length is 3' 1", so its pretty big. The reason I didn't make it compact was because I couldn't. The check valves had to be where they were, and they made the gun so long. I made the nozzle by drilling about a 10x hole into a 3/4" cap, and I hope that will work. I also have the nozzle off of my 1000 that I might use. It can fit inside 1" pipe snugly if it has some electrical tape around it. I haven't gotten to test it yet, because the glue needs to set. I'll try it later today. Over-all practicality in battle is yet to be decided. Because of its huge size, it will probably be a base defensive gun. I will put a strap on it as soon as I've tried it.
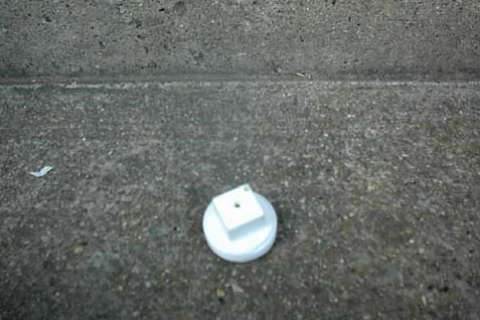
The cap on the tank. Hole is for ventilation.
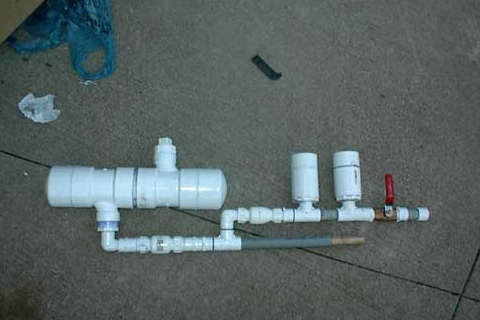
In all its glory.
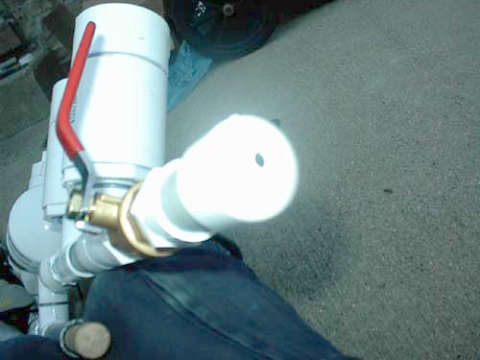
Here is the nozzle. Rated at about 10x.
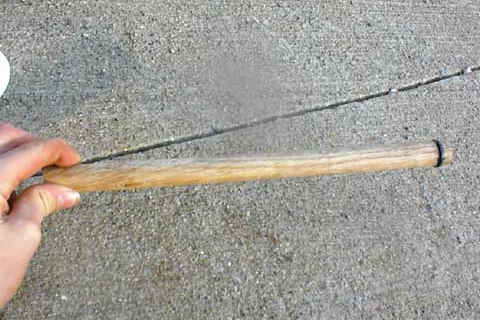
The pump. Made out of a wooden dowel and O-ring.

Closer on the O-ring.
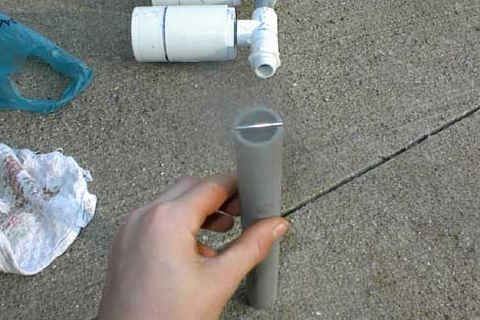
Pump shaft. I put the metal dowel there to prevent the pump from going into the rest of the internals.
Side view of pump shaft.
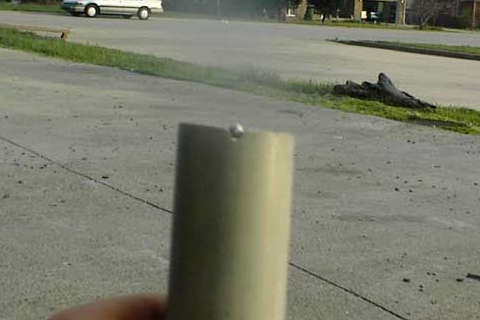
Ok, tests have been done. To my relief, the pump doesn't leak at all. It's perfect. In about 5 or 6 pumps, the pump becomes WICKEDLY hard to pump. Range leaves something more to be desired. It's 30+ feet. The nozzle is pretty good, but it still needs to be sanded a little more. Out of boredom, I installed a tire chuck to the PC's and pumped more air into it. Doing this, I got a max range of over 45ft, but it's not practical. This gun was just an experiment, the first homemade ever using separate PC technology.
2/18/04 (Super Soaker Central forums)
On my XP homemade, I just used a brass ball valve. Easy and cheap, yet not fun to pull, and you can only get one shot before the gun loses pressure. Also, an idea for the nozzle, I had done the same screw-on end cap thing as you did, but I also had a random 1000's nozzle which belonged to a broken 1000, and screwed it in. The mesh and grates on the inside of the nozzle I think help the stream stay together.
Comment:
A few people have asked why this water gun is on our website when we have some better designs. The reason is simple: for posterity. This was the first homemade water gun to use the same basic design as the APH water gun. Historically, it is interesting.
This webpage was compiled from a few posts at two different forums from back in 2003. I've ordered everything by time and labeled which forum each post came from. If the paragraphs seem a little unusual, it is only because they are simply copied posts from forums and were directed at someone in particular.
Some people tell me they have a hard time building water guns from our guides. When I built my first homemade water gun, these pictures were the only ones of a homemade water gun of this style. There was no guide. Just pictures. Luckily, I could construct a water gun simply from a picture. Today people have it much better people did than years ago. In honesty, when I first read about this water gun, I became convinced that building water guns wasn't as hard as people made it out to be at the time. And building sure wasn't hard—it was easy and very enjoyable.
This water gun also shows how much we have learned about making water guns since 2003, namely, the use of smaller diameter pumps to reduce the force of each stroke, using smaller, cheaper check valves, and the use of larger internal diameter pressure chambers to increase the capacity of the water gun. There are other, less notable changes, but for the most part this water gun is exactly the same as the APH design. It's not so similar just because I copied it—it is similar simply because it is the only way it can be made!
Pepper was a little ahead of his time and could have been bigger than he was. Hopefully you'll find this water gun as interesting as I did!
- Ben