SuperCAP
Written by Ben
Last updated on 2008-07-02
Note: This guide has minimal construction information. The water gun worked, but it had a number of problems that resulted in its reconstruction. Even still, I lost the majority of the construction and reconstruction photos for a reason unknown to myself. In this guide I will try to explain the CAP (constant air pressure) design and the faults of my own take on the design.
I plan on making another CAP water gun in the future that addresses every fault of this water gun. Because homemade water guns are a learning experience for everyone, I felt this page would be helpful to others. Avoid the mistakes I made in a similar design. (Yes, I do make mistakes!)
Scroll down to the bottom for pictures of the gun. For some more details about SuperCAP, check out the SSC forums thread on it.
Constant air pressure principle
CPS water guns work with a rubber bladder that makes the pressure, and therefore the water flow and range, constant. A constant air pressure (CAP) design makes pressure constant through the use of a pressure regulator. There is an air tank and a water tank in the CAP design. The air tank is pressurized at a higher pressure than the water tank and a regulator separates the two.
If you are having trouble understanding my explanation above, read CAP physics here at SSC.
What worked and worked too well
The frame backpack I mounted all my parts on worked great. I never had a problem with it.
The air pressure regulator I bought had a 3/8 inch inlet and outlet. I thought that might be necessary for a certain level of performance. Given that I never regulated the pressure beyond 60 or so PSI and the gun performed beyond my expectations in all categories, a smaller and cheaper 1/4 inch inlet and outlet regulator would work just as well.
The hand-held gun part I made worked well. The gun was easy to operate and could get a lot of water flow.
The ball valve to fill the gun was perfect. A ball valve is much more convenient than a threaded cap, despite the cost.
The air couplers I used to fill the air tank of the gun worked great. The seal was perfect and it couldn't have appeared more professional.
I had a valve to bypass the air regulator for an unregulated shot. That valve is unnecessary because the regulated shot is already too strong. I don't want to know what the unregulated shot is like.
What didn't work
The first thing that comes to mind is the height of this water gun. To save money, I used a long piece of 4 inch PVC pipe for the water reservoir as opposed to a shorter piece of wider pipe. That was a bad idea. The gun could get caught on things such as garage doors and trees. The entire thing looked hilarious. The gun should be redesigned to use its space more efficiently and be smaller.
The tubing clamps I used to hold some large 1 1/2 inch diameter tubing worked badly. The first clamps I used I suppose weren't rated for the force. Combine medium pressure with a big diameter and you have a lot of force on the clamps. I would get leaks from the tubing clamps and eventually those leaks would turn into a failure of the clamp as the tubing burst off and the gun would turn into a rocket. I had some very close calls due to that. I did get smacked by the gun and it wasn't pretty. I initially thought I broke my jaw, but I only bruised it. The gun itself cracked a few of the smaller 1/2 inch pipes, so I had to rebuild much of the gun. I now know to avoid the clamp problem completely and buy a smaller diameter (3/4 inch to 1 inch) tube that has threads on both sides. McMaster-Carr sells tubes like that.
Riot-blasts were interesting. I only could get off one riot-blast that we didn't get on video before the first failure of the gun. With so much water output (120X) and the water gun on my side, the gun itself acted as a torque arm and I was having trouble not spinning. My suggestion to use smaller diameter tubing leading to the gun would help with this problem. 120X riot blasts aren't particularly useful anyway.
What was changed during reconstruction
I added a lot of safety features during reconstruction. The first feature was stronger tubing clamps. I bought some clamps that were rated for a certain amount of torque. Needless to say, the tubing never leaked or burst off the clamps again.
I added a more accessible pressure release valve. Turning one valve would vent all of the air pressure in the gun. Previously that feature did not exist aside from the ball valve that filled the gun and the gun's trigger itself, both of which would have sprayed water, making releasing safety valves messy.
To that vent I also added an air muffler. Venting the air was loud. The air muffler made it quiet.
I added a valve to completely cut off the air flow to the regulator. That valve is necessary in refilling because you don't want any air flowing from the air tank while the fill valve is open.
I added a pressure gauge on the air tank. Previously there was none and I relied on the pressure the compressor put out to gauge how much was in the air tank.
Flexible air hose was used between the air tank and the water tank now to prevent breaking a bunch of rigid PVC pipe as occurred before in the accident.
Photos of SuperCAP
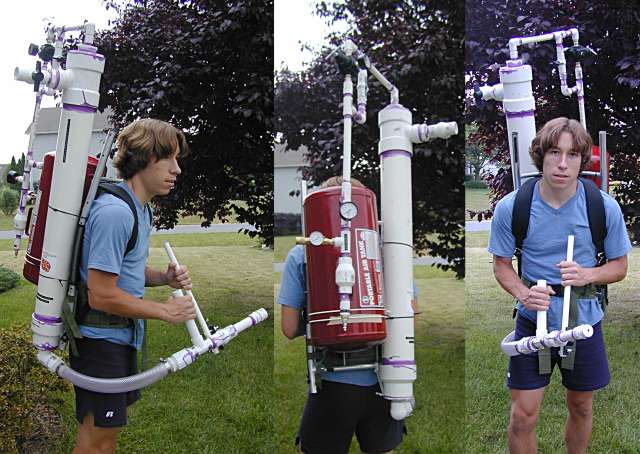
Here's SuperCAP in it's first design. Was it ridiculous looking? Yes. Was that the point? Maybe.
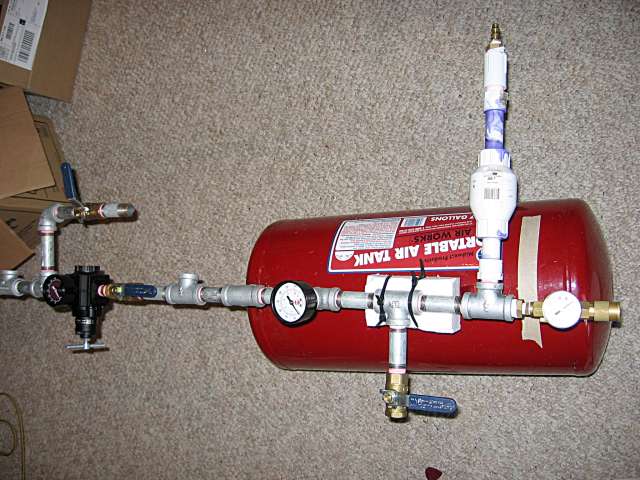
The image above is the only one I have of the rebuild. I did complete the rebuilt and I believe I tested it out later, but I do not have any photos of that.