Mad Zook
Written by Pepper
Last updated on 2007-12-01
The Mad Zook mod relocates the Quick filler, mods the P/C, and makes a nozzle out of PVC. The mod will increase water flow greatly, which in turn will directly affect range.
The materials needed:
- a small and medium Phillips head screwdriver
- a hack saw
- plumber's epoxy
- PVC pipe for the nozzle (preferably 1/4" or smaller)
- a bike inner-tube
- a safe place for screws
- scissors.
Step 1: Open your splashzooka. This is relatively easy. After taking all the screws out, put them in a safe place so you don't lose them. Pop off the back orange cap, and the orange cap in the front. After that, the whole gun should open up. Why don't you take a good look at it...Get used to it before continuing.
Step 2: Time to get cutting. First you will be removing the check valve. It is the valve which lets water out after you have filled the gun up all the way. It is easy to find. It is the white tube that extends from the normal internals. It has a black cap on top.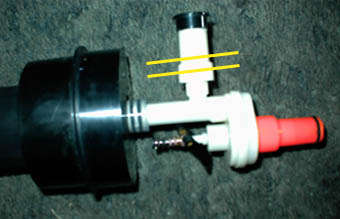
You want to cut in between the yellow lines in the photo above. The place where the tube gets slightly smaller is the ideal place to cut. After you have cut the valve off, you now have to cut the quick fill nozzle off. Cut exactly where the nozzle meets the rest of the internals. Try to keep all the pieces inside the nozzle in their proper positions. Make sure both cuts are straight because it will make the gluing easier. After you have cut both Pieces off, take off any excess plastic chips.
Step 3: Time to glue the Quick filler to the opening. But before you can glue the Q.F. on, you have to plug the nozzle. Use either a little of plumber's or regular epoxy. Make sure if you use regular epoxy, not to get it to far down the nozzle. After you have let it dry, test its strength by blowing in the nozzle, to simulate water pushing against the epoxy. After the nozzle is plugged, mix up a large batch of regular or plumber's epoxy for the Q.F./internals connection. Put a little of epoxy on both surfaces, and then join together. Don't put so much that it drizzles down into the internals. After the Q.F. is on, put lots more around the joint to prevent leaks later. Put lots and lots and lots on...Smother the joint with epoxy.
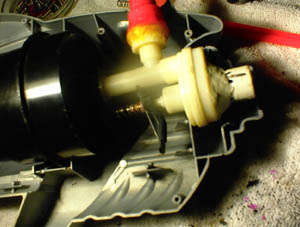
Step 4: Take your P/C and hold it so you can see the end of it. See the screws that hold the end of the P/C together? you will have to unscrew them. The way I did it was to cut slits in the Black circle so I could fit my screwdriver into the screws. After you have gotten the screws out, you have to wedge open the white part inside of the black circle. It's probably glued together, so you have to pry and poke to get it off. After you have disconnected the entire assembly on the back of the P/C, put layers of inner tube's on. You can put as many as you like, but if there are too many on, the gun wont be able to fill up thru the QFD. I put 2 layers on, and it works nice. I would say the maximum amount you should put on is 4-5 layers. Put the back assembly on and screw it up.
Step 5: Get your PVC pipe and get ready to make the nozzle. Cut about 1 inch from the pipe. This will be your nozzle. If you want, you can put a screen in the nozzle for coherency, but I didn't and it works alright. Get some epoxy and mix it together. Position the PVC so the valve is in the middle of the nozzle. Now put epoxy around the nozzle and internals. Try hard to not leave and cracks or holes.
Go outside and try it out. If you made good epoxy joints, the gun shouldn't leak at all. If the joints leak, try patching it up with more epoxy. If your nozzle is too big, you can find a PVC pipe piece that fits snugly inside the current one, then glue it with PVC glue.