Adding nozzle selector options
Written by joannaardway
Last updated on 2007-12-16
This modification will double the options your selector weapon has. I refer to the CPS 2700 as a example repeatedly during this guide because that's what I performed this mod on.
Disclaimer: I cannot be held responsible for damage done to you or your weapons when performing this modification, and it is performed at your own discretion. To some, it may seem that this guide is excessively long and contains too many details—this is to try and prevent unfortunate "mis-mods" because I'd rather that your expensive gun didn't go down the pan.
It takes 1-2 hours to mod. 2-3 hours was my initial time, and I needed to do a lot of thinking, guessing and inventing. With this guide, you should be quicker, especially because it contains hindsight. It takes varying times to dry, depending on the glue and putty used.
WHATEVER YOU DO, READ THE WHOLE OF THIS FIRST. SKIP NOTHING. MAKE SURE THAT YOUR WEAPON IS SUITABLE FOR THIS MOD.
Pros
- You have twice as many nozzle options.
- You get to choose exactly what these are.
- You don't lose any of the old options.
- Even if this goes wrong, it's unlikely that your weapon will be rendered useless.
Cons
- It's not the easiest mod.
- It's not easy, and the instructions may be hard to understand in places. I do try to make them simple, but I'm not infallible.
- Needs some unusual equipment and parts.
- I cannot speak for guns other than the CPS 2700.
This technique may work on other nozzle selector weapons, but use your common sense.
Guns that should be "good to go"
- CPS 2700 (definitely good to go)
- Weapons with a flat fronted, single part, "internally indented" (refer to "To find the size of the main drill bit for a weapon other than the CPS 2700" for a definition) nozzle selector piece.
- Weapons with mods. This is compatible with almost any other mod, but some may cause problems.
Guns which may have problems:
- Guns with a curved nozzle selector piece. (This can be deal with—it won't look pretty, but it should work)
- Guns with a two part nozzle selector piece. (I am pretty sure that this mod cannot work on this type of weapon, at least without some very impressive trickery)
Important points
- Make sure there is enough room between the current nozzles for a new one.
- Do not attempt to add anything more than doubling. However, I'm sure you won't want less than doubling. And even if you don't, I'm sure you can survive with double nozzle settings—invent some.
- Make sure that you have marked everything correctly, because a mistake could render the whole mod useless.
- Do not attempt this unless you have at least performed a basic nozzle size mod.
Equipment and parts list
- Drill bit—I will refer to this as the "Main" drill bit, as it's going to be the one you use most. (9 mm or 3/8" for the CPS 2700—if it's a different weapon, I explain later how to find out the size needed)
- Plumbers putty (also called putty epoxy or plumber's epoxy), or similar
- Your favourite glue to use on your water gun.
- Plastic sheet either 2mm or "stackable" to 2mm thick (i.e. glueing two 1mm pieces on top of each other, etc.). However, if it's stacked this may affect the stream lamination. You may want to find plasticard (sheet styrene in the USA) for this. At a pinch, the plastic cases for floppy discs should do the job. Whatever you do, don't use brittle plastic, because you will be drilling into it.
- Drill bits for all of the nozzles you wish to add. If you want a 4mm nozzle, get a 4mm-drill bit.
- Precision saw. You could do it with a hacksaw, but it will be harder.
- Files
- Optional: Paint roughly matching the colour of the nozzle selector piece.
Instructions
Remove the nozzle selector piece from the weapon—retain the springs and other pieces.
Locate your "main" drill bit.
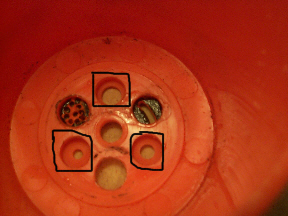
To find the size of the "main" drill bit for a weapon other than the CPS 2700, look on the inside of the nozzle piece. All the nozzles (should) have a circular indent, with the nozzle cut into the base of this. If you can't find an indent or the headpiece is made of two or more pieces, this method probably won't work. The original indents on my CPS 2700 are circled (alright squared) in the picture below.
Take a drill bit and insert the base of it (i.e. not the business end) into the indent (not the actual nozzle). If it's a tight fit then that's the size you need. Find the best fit you can and then proceed.
At this point, I chose to cut the plastic pieces shielding the old nozzles away, down to the point at which the nozzles actually start. However—before doing this make an educated guess—will the nozzles fit in the space you have?
(Remember that the nozzle will not be going immediately between the current nozzles, but "outside" of this.)
You will use this drill bit to drill the guide holes for the "buttons" that lock each setting into place. (i.e. you'll drill the equivalent of the holes not circled on the picture above—ignore the black plastic for the moment)
You need to mark points:
- "In between" all of the current nozzles, regardless of how many extra settings you want. So on a three-nozzle gun you need to mark three points.
- An equal distance from the centre of the two nozzles next to them (which is why it's easier to remove the extra plastic)
- An equal distance from the centre of the selector as one of the centre of the current nozzles is.
On a weapon with three nozzles, these distances should be the same. So on the CPS 2700 both distances are 13mm (roughly 1/2")
Drill a hole in each place you have marked with your "main" drill bit. You may want to sink a smaller hole first as a guide. You must drill these holes first—even if they're not the sizes you want, not go straight on to adding your new nozzles.
You should now have twice as many holes in the front of your nozzle piece.
Assuming the hole on your blaster (the bit with the mesh in it [at least on the CPS 2700]) is at least as large as one of the ones you have drilled (it should be on the CPS 2700), you may want to leave one as it is—This provides the direct equivalent of the "Power Mod" (except without the loss of settings) and allows you the max the weapon can manage without highly extensive modding.
For the other holes:
- Take the 2mm plastic sheet
- Cut it so that it covers the hole well (you need to ensure it fits between the current nozzles), and doesn't cover any other holes. Don't make it too large. Whatever you do, do not block the central hole that screws the piece to the front of the gun.
- Glue it over the hole, and plug the edges with the plumbers putty. (On weapons with curved nozzle sets, the putty is your friend.)
Once you have added the plastic sheet over all the holes—except if you are leaving one for the "Power Mod"—get out your drill bits and drill your new nozzle settings through the plastic sheet, making sure that the holes are directed at the guide hole on the other side. If you miss this guide hole, then this nozzle may well be rendered useless. This can be a very tricky part, and requires a lot of care. It may be better to drill from the inside of the piece to the outside. This way you can insure the holes are running in a sensible channel.
Paint the nozzles to match the colour scheme, and then leave to dry.
Your finished result should roughly match the below.
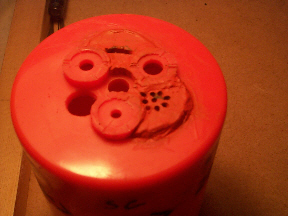
I elected to leave one nozzle for the "Power Mod" (20x—yeah!), drill 9 holes through one of the plastic sheets for a 9-way scatter shot, through the other I created a shotgun setting—This was intended to be a "sheet" of water, but for some reason it insists on spraying in a cone forwards. It's not a problem, because it's good for just hitting EVERYTHING.
In the picture, the bottom left nozzle is the 20x "power mod" nozzle, the upper nozzle is the shotgun nozzle and the bottom right nozzle is the 9 shot nozzle.
Enjoy the extra options!